Install · Connect · Verify
LMCP — Setup & Troubleshooting
LMCP runs on Mac (macOS 13+) and Windows (Windows 10+, 64-bit). It connects your AI assistant to supported apps and files, with 188+ tools on macOS and a separate Windows catalog. Local tools run on the device; chosen cloud AI providers and connectors receive the content needed for your requests under their own terms.
Install on Mac
One command in Terminal (Cmd+Space → “Terminal”):
curl -fsSL 'https://local-mcp.com/install?ref=setup' | bashOr via npm (auto-configures your detected clients):
npx -y local-mcp@latest setupPrefer the guided installer? Download the signed .pkg. Open the downloaded PKG and follow the Installer prompts. The installer places Local MCP in Applications and starts the menu-bar app; restart your AI client afterward.
Install on Windows
Download the signed Windows installer and run it in your user account; administrator rights are not required. Open Local MCP from the system tray, then restart your AI client. Supported integrations depend on the installed apps and connected accounts; Outlook automation requires classic Outlook.
For PowerShell and manual setup, follow the Windows getting-started guide. Apple Mail, Messages and EventKit integrations are macOS-specific.
After installing — activate in your client
Desktop apps connect free, no steps: LMCP sets up the desktop AI apps it finds; each one needs a restart or a new session to load it (Cursor: also enable local-mcp). Any other MCP client works too — see below.
Connect ChatGPT to your Mac
chatgpt.com → Settings → Security and login → Developer modeAdding a custom connector needs Developer mode, which is available on every ChatGPT plan — including Free. ChatGPT flags it high-risk because a custom connector can act on your data.
- 1
Install LMCP on your Mac
Download LMCP from local-mcp.com and run the installer — it installs Local MCP to Applications and auto-configures your AI clients in ~30 seconds.
- 2
Turn on web access and copy your Connection URL
Click the LMCP icon in your menu bar and find Your web AI · Cloud Relay. Turn web access ON (it is off by default for privacy), then open your assistant’s panel and click Copy URL.
The URL is — it carries no token and is the same for everyone; every step below that says “the URL you copied” means this one. Access is granted by approving the connection on your Mac, not by the URL. - 3
Turn on Developer mode (one-time)
Use a desktop browser at chatgpt.com — connectors can’t be added from the mobile or desktop apps. Open Settings → “Security and login” and turn on Developer mode: it’s the one-time prerequisite, and the custom-connector section (labeled “Connectors”, “Apps” or “Apps & Connectors” depending on rollout) only appears after it’s on — that’s why there may be no “Apps” yet.
Still don’t see it? Fully reload chatgpt.com after toggling — Developer mode also has to stay on to use the connector. On Business/Enterprise/Edu a workspace admin must enable connectors first. - 4
Create the LMCP connector
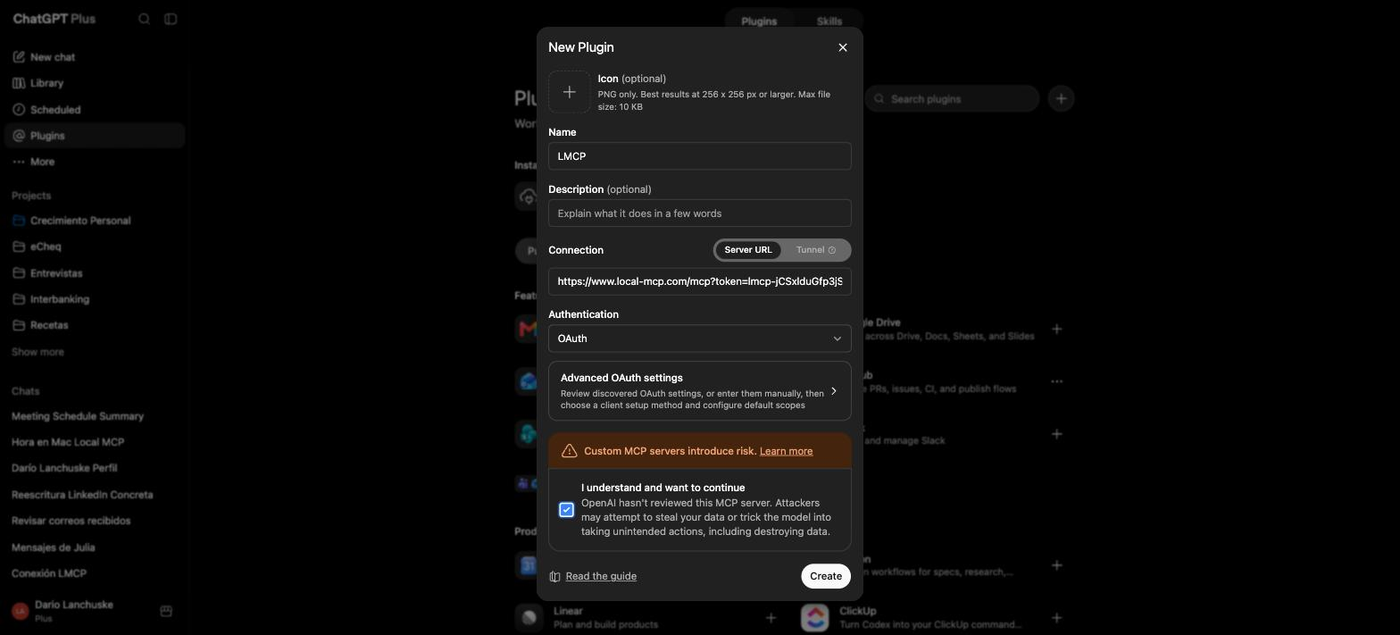
With Developer mode on, go to chatgpt.com/plugins and click the + at the top right — that is where the button lives, not on the Settings page (Settings → Plugins → “Browse plugins” takes you to the same screen). Fill in Name: and, in Server URL, paste the URL you copied from the LMCP menu bar (). Authentication stays on “OAuth” — that is already the default, and the client ID/secret stay empty because we auto-register. Tick I understand and want to continue and click Create.
- 5
Sign in and approve on your Mac
Create only registers the connector — it still reads “No app actions available yet”. Click Sign in with LMCP: ChatGPT opens an Authorize page on , and a dialog appears on your Mac. Click Approve there and the tool catalog loads.
If no dialog shows up, or the page says LMCP isn’t running, the approval simply expired — it only lasts 5 minutes. Click the button again; nothing needs reinstalling.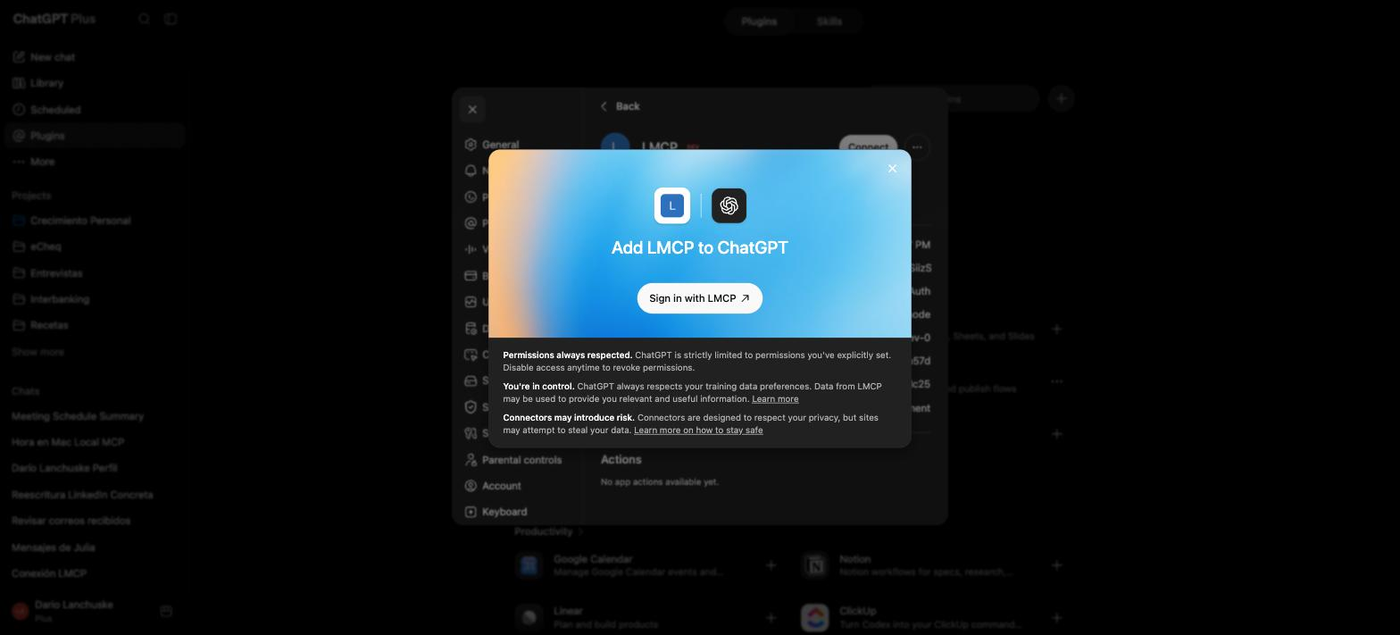
- 6
Enable it in a chat
Start a new conversation and enable the LMCP connector from the composer’s tools menu (+). Then ask: “List my email accounts” or “What meetings do I have today?”
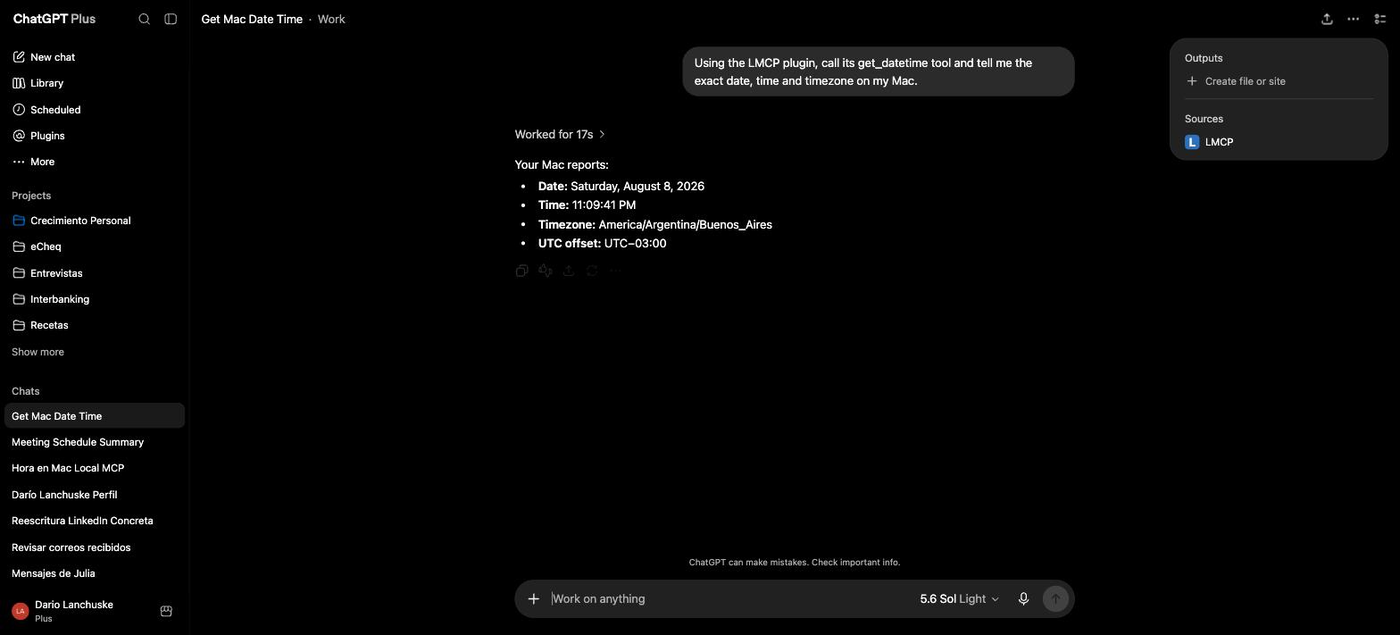
Steps verified 2026-08-08. Local tools run on your device; selected AI providers and connectors receive requested content. Review each tool’s permissions and approval behavior.
Connect Claude.ai to your Mac
claude.ai → Settings → Customize → Connectors- 1
Install LMCP on your Mac
Download LMCP from local-mcp.com and run the installer — it installs Local MCP to Applications and auto-configures your AI clients in ~30 seconds.
- 2
Turn on web access and copy your Connection URL
Click the LMCP icon in your menu bar and find Your web AI · Cloud Relay. Turn web access ON (it is off by default for privacy), then open your assistant’s panel and click Copy URL.
The URL is — it carries no token and is the same for everyone; every step below that says “the URL you copied” means this one. Access is granted by approving the connection on your Mac, not by the URL. - 3
Open Claude’s connector settings
Open Settings → Customize → Connectors (connectors moved here from the old Settings page), or go straight to claude.ai/settings/connectors. On Team/Enterprise an owner has to add it first from Organization settings → Connectors.
- 4
Add a custom connector
Click Add → Add custom connector. Set Name: and Remote MCP server URL: paste the URL you copied (). Click Add.
- 5
Connect it — this is the step people miss
Add only registers the connector. It now reads “You’re not connected to LMCP yet” — click Connect, then Approve in the dialog that opens on your Mac. Claude only loads the tools after this.
- 6
Enable it in a chat
Start a new conversation, enable the LMCP connector, and ask: “List my email accounts” or “What’s on my calendar today?” With Cloud Data Forwarding ON you’ll see 188+ tools.
Steps verified 2026-08-08. Local tools run on your device; selected AI providers and connectors receive requested content. Review each tool’s permissions and approval behavior.
Connect Any MCP client to your Mac
Works with any client that speaks the Model Context Protocol — Claude Desktop, Cursor, Windsurf, VS Code, Zed, Cline, Raycast, and more.
- 1
Install LMCP
Download from local-mcp.com. The installer sets up the AI apps LMCP supports that it finds on the machine, and the LMCP menu shows each one and whether it still needs something from you.
- 2
Add the server to any other MCP client
In your client’s MCP config, add a stdio server with command and args :
- 3
Restart the client
Restart your MCP client to load LMCP tools for your platform. Local tools run on your device; selected AI providers and connectors receive content needed for your requests. Permissions and authorization vary by integration.
Steps verified 2026-07-14. Local tools run on your device; selected AI providers and connectors receive requested content. Review each tool’s permissions and approval behavior.
Common fixes
- Menu-bar app not running: restart / permissions steps →
- Tools don’t show up: fully quit and reopen the AI client (it loads MCP servers at launch). For Cursor, also enable it under Settings → MCP.
- Permission prompts (Calendar / Contacts / Automation): approve them when macOS asks — they’re granted once and persist.
- Still stuck? See the getting-started guide or browse all guides.
On Windows? LMCP runs there too — install it on Windows. Linux is not supported yet — join the waitlist.